Introduction
Damaged footwear is one of the top reasons buyers file shipping claims — and a single return on a $200 pair of sneakers can wipe out the profit from five sales. Shoes present a specific packaging challenge: rigid structure, irregular shape, and a value range that spans $15 sandals to $3,000 collectibles.
A crushed toe box, scuffed patent leather, or snapped heel can turn a profitable sale into a costly return. Improper packaging can also void insurance claims entirely, leaving you with no recourse.
This guide covers exactly what you need: the right supplies, step-by-step packing instructions, how shoe type changes your approach, the biggest cost and safety factors, and the most common mistakes to avoid. Whether you're shipping a pair of collectible Jordans or everyday sandals, you'll learn how to protect your footwear and control costs.
Key Takeaways
- Shoes must be cleaned, stuffed to hold shape, wrapped individually, and placed in a correctly sized corrugated box with adequate cushioning
- Boot shafts need internal stuffing, heel tips require extra bubble wrap, and sandal straps should be wrapped separately
- Dimensional weight often determines shipping cost: a 14"×5"×7" box bills at 4 lbs with FedEx/UPS, even if the shoes weigh only 2 lbs
- USPS Priority Mail wins for lightweight shoes under 3 lbs; UPS and FedEx Ground are better for boots over 5 lbs
- Insure high-value shoes before shipping—standard carrier liability covers only $100
What You Need to Ship Shoes Securely
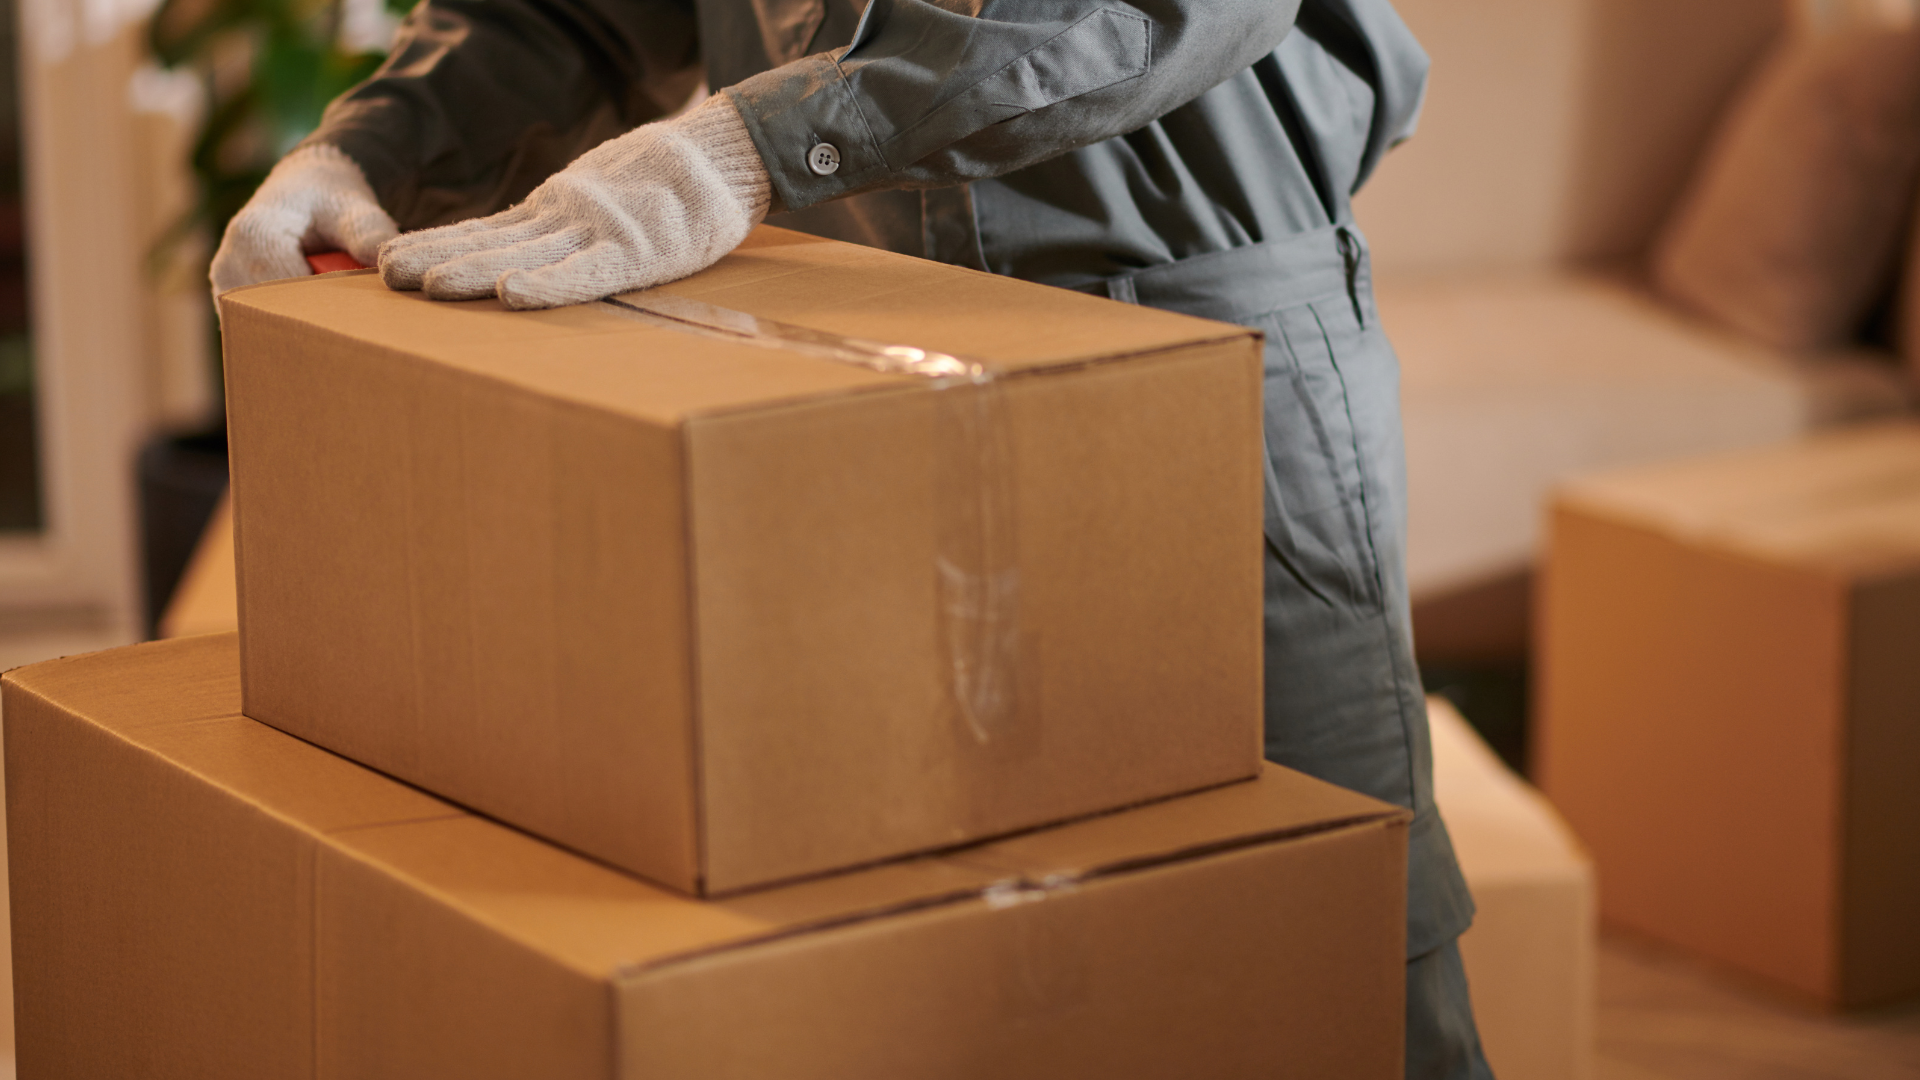
Having the right materials ready before you start prevents damaged shipments — and ensures carriers can't deny claims due to inadequate packaging. Improvising with whatever's on hand is one of the most common reasons footwear arrives crushed or wet.
Packing Materials
Core materials include:
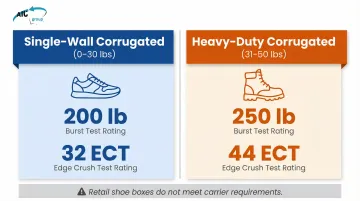
- Corrugated shipping box (not the retail shoe box alone), which must meet the 200 lb burst test or 32 ECT rating
- Acid-free tissue or packing paper for wrapping delicate materials
- Bubble wrap (3/16" cell size works well for most shoes)
- Pressure-sensitive packing tape rated for shipping, minimum 1.6 mil thickness
- Poly bags or plastic wrap for moisture protection
- Stuffing material—crumpled packing paper, foam inserts, or shoe trees to maintain shape
For businesses shipping shoes regularly, sourcing materials in bulk cuts per-unit cost noticeably. Alliance Packaging Group carries over 1,000 box sizes and 10,000 packaging products available for immediate nationwide shipment, which makes it practical to standardize on the right box dimensions rather than improvising with whatever's in stock.
Box Selection
Box size directly impacts both protection and shipping cost. A box that's too large creates internal movement and triggers dimensional weight surcharges; too small risks crushing the shoes or the retail box inside.
Recommended approach:
- Add 2-3 inches of clearance on all sides for cushioning material
- Standard sneakers typically need boxes around 14"×7"×5"
- Boots require taller boxes (minimum 12-14" height depending on shaft length)
- Multiple pairs need boxes sized to accommodate each pair wrapped separately with cushioning between them
Carriers require corrugated boxes with specific structural ratings. For footwear weighing 0-30 lbs, use single-wall corrugated with a 200 lb burst test or 32 ECT rating. Heavier boots (31-50 lbs) need 250 lb burst test or 44 ECT boxes.
How to Ship Shoes Securely: Step-by-Step
Step 1: Clean and Prepare the Shoes
Clean shoes before packing—dirt, moisture, or odors can damage shoes further in transit or create issues with the recipient. Dry shoes completely before packing; moisture trapped inside packaging can lead to mold or material degradation.
For high-value or resale shoes, document condition before packing. Take clear photos of the shoes from multiple angles, focusing on any existing wear or imperfections. This documentation protects you if the buyer claims pre-existing damage that wasn't caused by shipping.
Step 2: Stuff the Shoes to Maintain Shape
Unstuffed shoes collapse, crease, or deform during transit. Fill each shoe with crumpled packing paper, foam inserts, or shoe trees to maintain structure.
Critical areas to stuff:
- Toe boxes: pack firmly to prevent crushing from stacking pressure
- Heel counters: stuff to maintain the rigid structure
- Boot shafts: fill completely to prevent permanent creasing
A collapsed toe box or creased boot shaft can't be fully restored — getting the stuffing right before you seal the box is far easier than dealing with damage claims after delivery.
Step 3: Wrap Each Shoe Individually
Wrap each shoe separately in tissue paper, packing paper, or bubble wrap. This prevents scuffing, color transfer, and abrasion between the pair.
Material-specific wrapping:
- Suede and nubuck: use acid-free tissue paper first, then bubble wrap for outer protection
- Patent leather: wrap in soft tissue to prevent surface scratching; avoid direct contact with bubble wrap, which can leave texture marks
- Standard leather or rubber soles: packing paper or bubble wrap works well
- Embellished shoes: wrap delicate straps, buckles, or decorative elements separately to prevent snagging
- Heels: add extra bubble wrap around the heel tip — these can puncture packaging and break during transit
Step 4: Place Shoes in the Shipping Box with Cushioning
Proper layering eliminates movement and protects against impact:
- Start with a base layer of 2-3 inches of crumpled paper or bubble wrap on the box bottom
- Position the shoes sole-to-sole or heel-to-toe depending on fit
- Pack all sides and top with cushioning to eliminate any gaps
- Shake the sealed box — if anything shifts, add more fill material before sealing
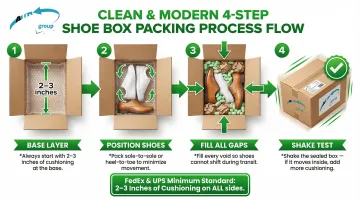
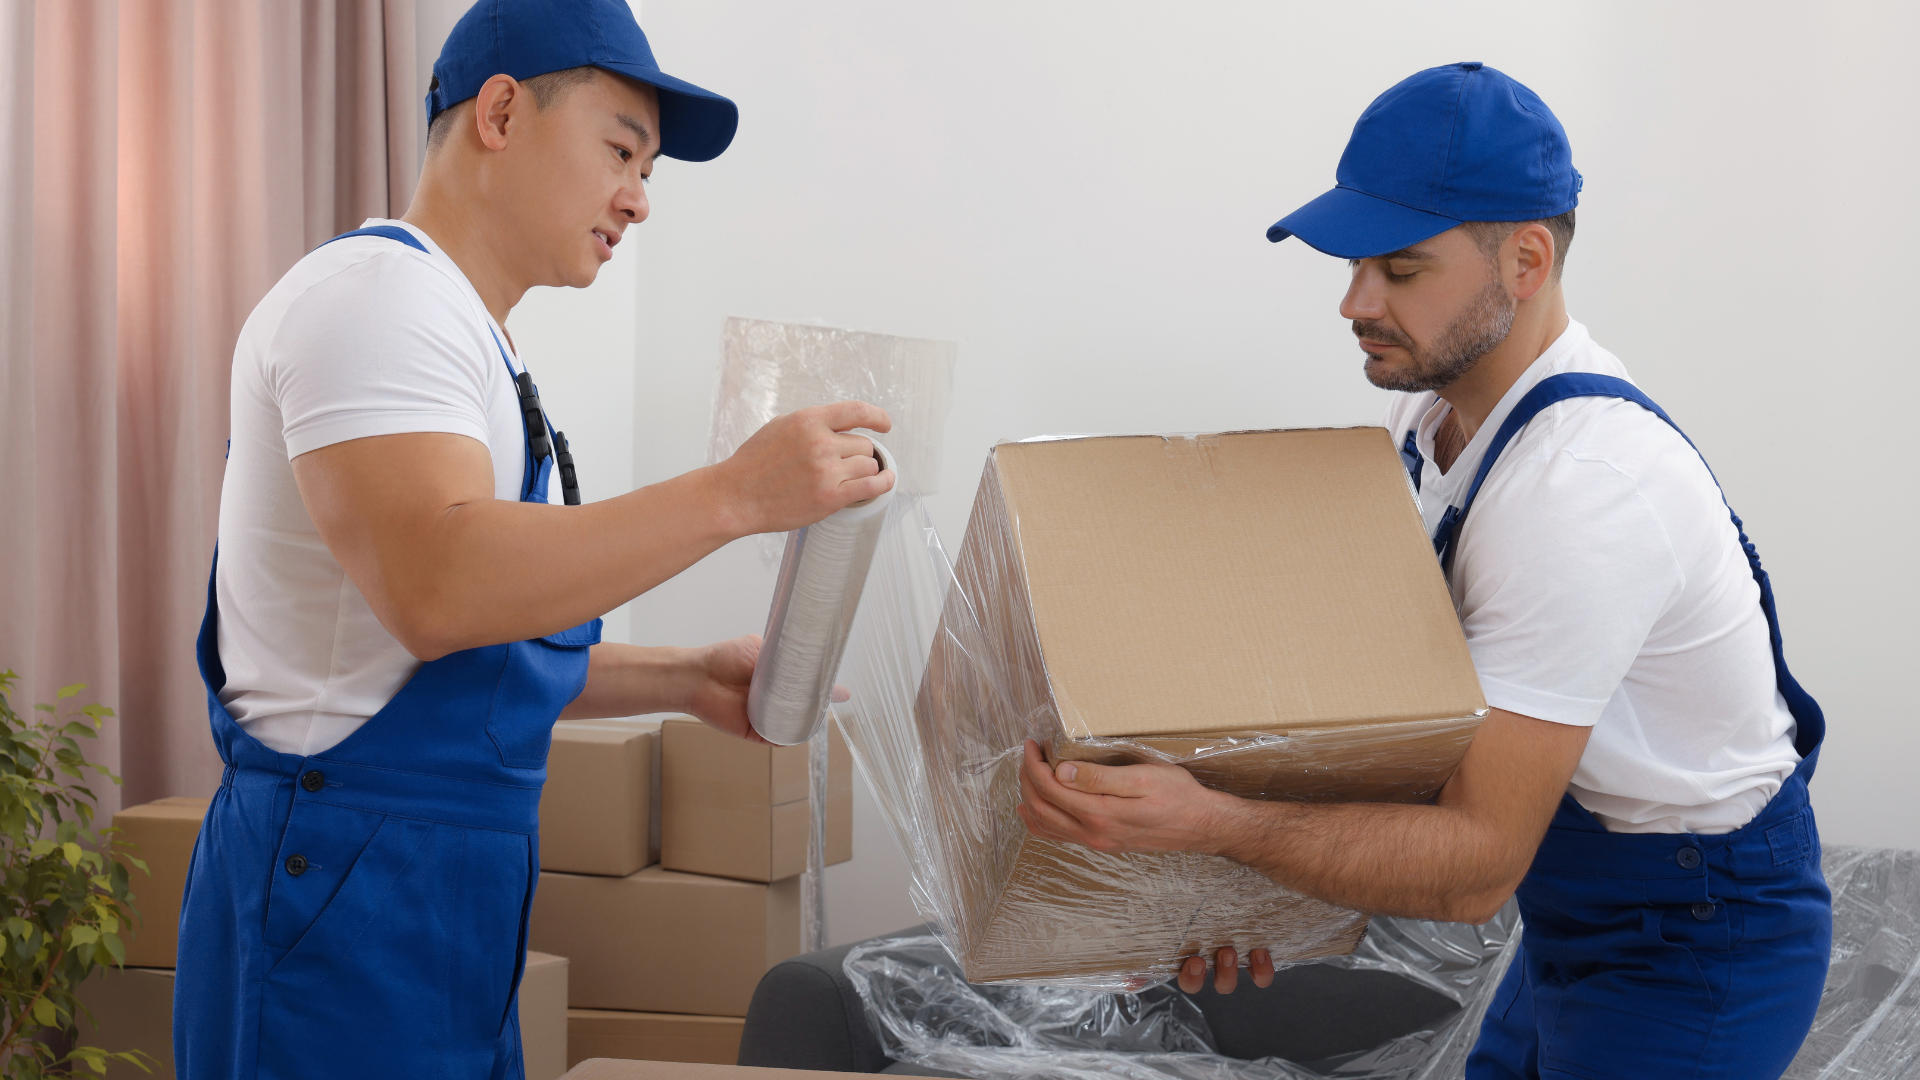
FedEx recommends 3 inches of cushioning on all sides for fragile items, while UPS requires a minimum of 2 inches around contents. For double-boxing valuable shoes, place the retail shoe box inside a corrugated outer box with 3 inches of cushioning between them.
Step 5: Seal and Label the Package Correctly
Proper taping technique: Use the H-tape method on all seams. Apply pressure-sensitive packing tape (minimum 1.6 mil thickness) across the center seam, then seal both side seams. Repeat on the bottom. This distributes stress across multiple tape lines and prevents box failure.
Labeling best practices:
- Print a clear shipping label (handwritten addresses increase delivery errors)
- Place label flat on the largest box surface
- Cover label with clear tape to protect from moisture
- Double-check address and return address before drop-off
- Remove or cover old shipping labels to prevent routing errors
How Shoe Type Affects Your Packing Approach
One-size-fits-all packing doesn't work for shoes. Structure, heel height, sole thickness, and material each change what protection is actually required — sometimes dramatically.
Sneakers and Athletic Shoes
Sneakers are bulkier but more forgiving structurally — main risks are sole separation and upper creasing.
- Stuff the toe box firmly with crumpled paper
- Wrap laces separately or tuck inside shoes to avoid snagging
- Use boxes with adequate height to accommodate chunky soles
- Standard weight: 1.5–2.5 lbs per pair (with box)
Heels and Dress Shoes
Heel tips are the most vulnerable point—they can puncture packaging and break in transit.
- Wrap extra bubble wrap around each heel tip
- Position heels so they're not bearing weight or pressing against box sides
- Stuff toe boxes to prevent crushing
- For stilettos, insert heel tips into small cardboard tubes for added protection
- Standard weight: 0.9–3.5 lbs per pair (men's Oxfords run heavier than women's heels)
Boots
Boots require taller, narrower boxes and extensive internal stuffing.
- Stuff the entire shaft with crumpled paper or foam to prevent folding and permanent creasing
- Use boxes at least 12–14" tall depending on boot height
- Work boots and hiking boots (2.4–7.9 lbs) push into higher carrier pricing tiers — factor this into shipping costs
- For leather boots, stuff aggressively to maintain shape under compression
Sandals and Flat Footwear
Sandals are deceptively fragile—thin straps, embellishments, and flexible soles break or tangle easily.
- Wrap each strap individually with tissue paper
- Use rigid cardboard inserts between sandals to prevent bending
- Lightweight sandals (0.6–1.1 lbs) can ship in padded mailers — but only if they have no embellishments or rigid structure
- For designer sandals with hardware, use corrugated boxes with cushioning
What Affects Shoe Shipping Cost and Safety
Cost is determined by more than weight. Actual weight, dimensional (DIM) weight, zone/distance, declared value for insurance, and carrier choice all factor in. Understanding how each element works helps you avoid overpaying and choose the right carrier for every shipment.
Understanding DIM weight: Carriers charge based on the greater of actual weight or dimensional weight. DIM weight is calculated by dividing box volume by a divisor:
- FedEx/UPS: (Length × Width × Height) ÷ 139
- USPS: (Length × Width × Height) ÷ 166 (only applies if volume exceeds 1 cubic foot)
Example: A box measuring 14"×5"×7" (490 cubic inches) with shoes weighing 2 lbs:
- FedEx/UPS DIM weight: 490 ÷ 139 = 3.53 lbs, rounds to 4 lbs billable weight
- USPS: 490 cubic inches is less than 1,728 (1 cubic foot), so you pay actual weight (2 lbs)
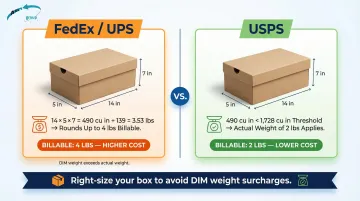
An oversized box can cost as much as shipping heavier shoes — right-sizing your packaging is one of the easiest ways to cut carrier costs.
Carrier Comparison
USPS Priority Mail:
- Retail rates: $11.05-$39.25 for 2 lbs depending on zone
- Commercial rates start at $8.43 for local zones
- DIM weight doesn't apply to most shoe boxes (under 1 cubic foot)
- Includes $100 insurance coverage
- Flat-rate options available but typically not cost-effective for single pairs
UPS and FedEx Ground:
- UPS Ground: $12.55-$20.29 for 2 lbs (small business rates, before surcharges)
- 5 lb boots: $13.25-$22.47 depending on zone
- Add residential surcharge (~$3.55) and fuel surcharge
- Standard liability: $100 unless higher value declared
- DIM weight often applies, increasing cost for bulky boxes
When to use each:
- USPS Priority Mail: Single pairs of sneakers or sandals under 3 lbs traveling any distance
- UPS/FedEx Ground: Boots over 5 lbs, multiple pairs, or business-to-business shipments
- Freight consolidation (pooling shipments with a fulfillment partner): Best for bulk shoe sellers shipping 10+ pairs regularly
Insurance and Declared Value
Shipping insurance is essential for collectible sneakers, designer shoes over $200, or any footwear you can't afford to lose.
Standard coverage:
- USPS Priority Mail: $100 included
- UPS Ground: $100 liability limit
- FedEx Ground: $100 liability limit
Additional coverage costs:
- USPS: $2.70 for up to $50; $4.20 for $100.01-$200; $1.40 per additional $100
- FedEx: $3.50 for $100.01-$300; $1.25 per $100 above $300
- UPS: Similar to FedEx structure
Documentation for successful claims: All carriers require the same core documentation to process a claim:
- Proof of value (receipt or invoice)
- Photos of the damage and original packaging
- Original packaging retained until the claim is resolved
For high-value shoes, photograph the condition before packing, then shoot the sealed box exterior before handing it off to the carrier.
Common Mistakes When Shipping Shoes
Most shoe shipping damage and cost overruns stem from avoidable errors.
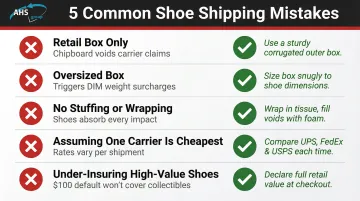
- Relying on the retail shoe box alone — Branded shoe boxes are chipboard, not corrugated fiberboard. FedEx explicitly states: "Chipboard boxes must be packed into a corrugated fiberboard outer box." Using a retail box alone can void damage claims.
- Choosing a box that's too large — Excess empty space lets shoes shift in transit. A box just 2 inches larger in each dimension can trigger DIM weight charges, adding $3–5 per shipment.
- Skipping stuffing and wrapping — Even short domestic shipments involve conveyor belts, drops, and stacking. Unwrapped shoes absorb every impact directly, and a collapsed toe box or scuffed leather is permanent damage.
- Assuming one carrier is always cheapest — USPS wins for lightweight shoes traveling long distances; UPS/FedEx are better for heavy boots or short hauls. Compare rates before every booking.
- Under-insuring high-value shoes — Standard $100 coverage won't protect a $500 pair of collectible sneakers. Declare full value and add coverage—it typically costs $5–8 and protects your entire investment.
Frequently Asked Questions
How much does it cost to ship out a box of shoes?
Shipping a standard 2 lb pair of shoes costs $8-$12 via USPS Priority Mail (commercial rates) or $11-$20 via UPS/FedEx Ground depending on distance. Heavier boots (5 lbs) run $13-$22 with ground services. USPS typically wins on price for lightweight shoes; UPS/FedEx tend to be more competitive for heavier boots.
Do shoes dry rot in boxes?
Yes, but it's a storage concern—not a shipping one. Long-term box storage (1.5-8 years) degrades midsole foam through moisture and lack of airflow. For transit lasting a few days, proper moisture protection and secure packing is all that's needed.
What is the best box size for shipping shoes?
Use a box that allows approximately 2-3 inches of padding space on all sides around the shoes. For standard sneakers, boxes around 14"×7"×5" work well. Oversized boxes increase cost via dimensional weight, while undersized boxes risk crushing—right-sizing saves money and protects shoes.
Should I use the original shoe box when shipping?
Never use the retail shoe box as the sole outer packaging—it's chipboard, not corrugated fiberboard, and carriers can void damage claims if it fails in transit. To preserve the original box, nest it inside a corrugated shipping box with proper cushioning on all sides.
Can I ship shoes in a poly mailer instead of a box?
Poly mailers work for lightweight sandals or flat shoes under 5 lbs with no rigid structure. They're insufficient for structured shoes, boots, or high-value pairs that need impact protection. For most footwear, corrugated boxes are the right call.
How do I ship multiple pairs of shoes in one box?
Wrap each pair separately in bubble wrap or packing paper, place them sole-to-sole to minimize box size, and cushion between pairs with crumpled paper or foam to prevent grinding. Use a box with 2-3 inches of cushioning on all sides and do a shake test before sealing.