Introduction
Poor warehouse rack labeling silently drains profitability from operations every day. Mispicks caused by unclear or inconsistent location labels cost warehouses an average of $30 to over $75 per incident, with larger facilities losing between $400,000 and $600,000 annually to these preventable errors. A facility picking 6,400 items daily with just a 1% mispick rate faces potential losses of $1,920 per day—nearly $58,000 per month.

Those numbers don't capture the full picture. Labeling confusion forces pickers to waste time hunting for locations, pulls supervisors into error-chasing instead of process improvement, and pushes inventory systems out of sync with physical reality.
This guide walks through the complete process of labeling warehouse racking efficiently — from building a logical address system and selecting durable materials to installing labels consistently and sidestepping the mistakes that force costly facility-wide relabeling projects.
Key Takeaways
- Build a hierarchical address system (Zone-Aisle-Bay-Level-Bin) before printing a single label
- Place labels at the same spot on every rack — typically the left upright at eye level — for consistent, instinctive scanning
- Match label material to your environment: adhesive laminated for permanent setups, magnetic for frequent changes, freezer-grade for cold storage
- Keep physical label names identical to WMS location codes to prevent picking errors and maintain system trust
- Use sequential numbering with leading zeros and alternating numbers/letters to minimize transposition errors and allow future expansion
Step-by-Step: How to Label Warehouse Racking
Effective warehouse rack labeling starts with planning — before any label touches a rack. Rushing into printing and applying labels without mapping the layout or designing the address system first is the mistake that most commonly causes rework, WMS mismatches, and operational confusion at go-live.
Step 1: Map Your Warehouse Layout and Define Zones
Walk the physical space with a floor plan and identify distinct operational zones before assigning any labels:
- Bulk storage areas for reserve inventory
- Forward pick zones for high-velocity items
- Overstock or seasonal sections
- Receiving and staging areas
- Value-added services or kitting zones
Establish these highest-level organizational units first. Zones anchor your entire address system and determine how labels cascade down through aisles, bays, and bins. Mark zone boundaries clearly on your floor plan and confirm they align with how your WMS organizes inventory.
Step 2: Design Your Location Address System
Document your naming hierarchy (Zone-Aisle-Bay-Level-Bin) completely before generating any labels. This system must be:
- Every location has one distinct, non-repeating address
- Follows a consistent pattern that any new hire can learn quickly
- Moves logically from largest area down to smallest bin
- Built with room to expand without triggering a full relabeling project
Confirm the address system matches exactly how your WMS records and retrieves locations. Physical labels and system entries must never be out of sync: mismatches are a leading cause of WMS implementation failures and operators quickly lose confidence in the system.
Step 3: Generate and Print Your Labels
Create labels that combine human readability with scanning capability:
Include both text and barcodes:
- Human-readable location address (e.g., "A-03-B-02")
- Scannable barcode (1D Code 128 or 2D Data Matrix)
Size labels appropriately for scan distance:
- 15 mil Code 128 barcodes scan reliably from 5 inches to 8.3 feet
- 40 mil Code 128 barcodes extend range to 21.7 feet
- 100 mil Data Matrix codes enable scanning up to 33 feet
For high racks above 10 feet, use larger barcode dimensions (40-100 mil) or install supplementary rack-end signs at eye level. Standard handheld scanners require minimum 10 mil barcode dimensions, with 100 mil recommended for distances beyond 16 feet.
Once labels are printed and verified, consistent placement during installation is what determines whether pickers can move fast — or spend time hunting.
Step 4: Install Labels Consistently Across All Racks
Consistency in label placement is critical — pickers should never have to search for a label:
- Pick one standard location — left upright of each bay at eye level (48-60 inches) or the beam face — and use it everywhere
- Don't mix placement: left uprights in one aisle and right beams in another creates immediate confusion
- Keep all labels at the same vertical position throughout the facility
For multi-level racking:
- Use directional arrows on level labels pointing to the specific shelf
- Install rack-end "totem" signs listing all levels (A, B, C, D) for quick vertical orientation
- Place level-specific labels on the beam face directly at each shelf height
With installation complete, a brief dry run before go-live catches problems that are far cheaper to fix now than after hundreds of orders are in the system.
Step 5: Test the System with a Dry Run Before Going Live
Before declaring the labeling project complete, validate the system under real conditions:
Picker navigation test:
- Send staff through labeled aisles with sample pick tickets
- Note any locations where confusion occurs or labels are hard to find
- Adjust placement, size, or format based on feedback
Barcode scanning verification:
- Test every barcode with your handheld devices under actual warehouse lighting
- Verify high shelves, low-light areas, and locations near overhead doors
- Confirm scan accuracy from expected working distances (2-10 feet typical)
This dry run prevents the costly discovery of labeling failures after go-live when hundreds of orders are already in the system.
Designing Your Warehouse Location Address System
The location address system is the backbone of warehouse rack labeling. Like a postal address, it must be unique, logical, and hierarchical: it starts from the largest area and drills down to the smallest bin. A well-designed system reduces picking errors, supports intuitive navigation, accommodates future growth, and gives new pickers a location they can find on day one.
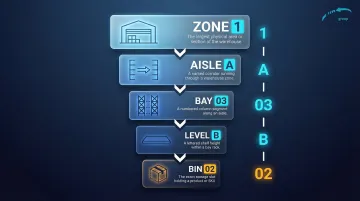
The Standard Hierarchy: Zone-Aisle-Bay-Level-Bin
The industry-standard naming scheme follows this pattern:
Zone → Aisle → Bay (Rack) → Level (Shelf) → Bin
Example: Location 1-A-03-B-02 means:
- Zone 1: Dry goods storage area
- Aisle A: First aisle in the zone
- Bay 03: Third vertical rack section in the aisle
- Level B: Second shelf from the bottom (A=bottom, B=second, C=third)
- Bin 02: Second position on that shelf
This hierarchical structure creates addresses that guide pickers logically from the warehouse entrance to the exact bin.
Alternating Numbers and Letters Reduces Errors
Use letters for some fields and numbers for others within your address string. This pattern creates natural visual breaks that make long location codes easier to read at a glance and reduces transposition errors:
- Numeric aisles (01, 02, 03) paired with alpha levels (A, B, C)
- Alpha zones (W, X, Y) paired with numeric bays (01, 02, 03)
Good example: 2-A-05-C-03 (clear visual separation)
Poor example: 2-1-05-3-03 (numbers blur together)
Sequential Numbering Best Practices
Design your numbering scheme to support efficient pick paths and future growth:
Number aisles and bays in order:
- Aisles: 01, 02, 03, 04 (or 02, 04, 06, 08 for expansion flexibility)
- Bays: 01, 02, 03 within each aisle
Use odd/even numbering for one-directional pick paths:
- Odd-numbered bays (01, 03, 05) on the left side of the aisle
- Even-numbered bays (02, 04, 06) on the right side
- Supports efficient "zig-zag" picking that minimizes backtracking
Always use leading zeros:
- Ensures correct WMS sorting — 01, 02, 03, 10 sorts properly; without zeros, 1, 10, 2, 3 does not
- Maintains consistent character length for scanning and data entry
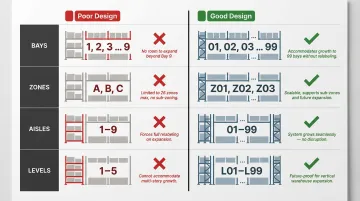
Build Scalability Into the System
Design your numbering scheme with room to grow. Relabeling an entire warehouse is expensive; the right format prevents that upfront:
- Current state: 6 bays in an aisle
- Poor design: Number them 1-6 (no room to add bay 10 without reformatting)
- Good design: Number them 01-06 (accommodates growth to 99 bays)
The same logic applies to every level of the hierarchy — zones, aisles, bays, and bins. Build in capacity now so your address structure stays stable as your operation scales.
Choosing the Right Label Material for Your Racks
Label material selection directly impacts scanning accuracy, longevity, and total cost of ownership. The wrong material fails quickly in harsh environments, forcing expensive relabeling projects. Choose based on three factors: operating environment, layout change frequency, and budget.
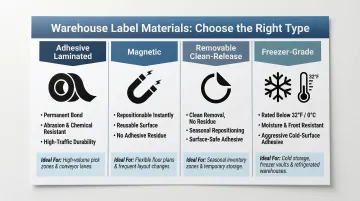
Adhesive Laminated Barcode Labels
Best for: Permanent, high-traffic installations where durability matters most
Adhesive laminated labels with UV-resistant inks and protective coatings deliver the longest service life in stable warehouse environments. The laminate layer protects barcodes from forklift contact, direct sunlight, chemical exposure, and daily wear. These labels maintain scan accuracy for years without replacement.
Specs to look for:
- Polyester or vinyl facestock with protective laminate overlay
- Permanent acrylic adhesive for long-term bonding
- UV-resistant printing (thermal transfer resin ribbons)
- Service temperature range: -40°F to 150°F for standard grades
This is the most common choice for warehouses with established layouts and minimal reconfiguration needs. For in-house label production, confirm your thermal transfer ribbons are compatible with your printer brand (Zebra, Datamax, and Sato are the most widely supported).
Magnetic Labels
Best for: Warehouses with frequent layout changes, cold storage, or multi-tenant 3PL operations
Magnetic label holders attach to metal racking without adhesive, allowing easy repositioning without scraping, residue, or surface damage. They're ideal when rack configurations change quarterly or when different clients require distinct location schemes.
Specs to look for:
- Pull force: 6.2 to 11.8 pounds per foot (prevents accidental displacement)
- Service temperature: -30°C to 55°C (-22°F to 131°F)
- Reusable indefinitely—remove and reapply without degradation
That flexibility comes with tradeoffs worth considering:
- Higher upfront cost per label (typically 2–3x adhesive labels)
- Can be knocked off by forklift impacts in high-traffic areas
- Require metal surfaces — won't work on wood or plastic racking
Removable Clean-Release Labels
Best for: Facilities needing flexibility without the cost of magnetic labels
Removable labels use specialized adhesives that bond firmly during use but peel cleanly without leaving residue or damaging paint. They're suited for seasonal reconfigurations, WMS upgrades requiring location changes, or temporary labeling during facility transitions.
Specs to look for:
- Removable acrylic adhesive (not permanent)
- Clean removal within 6–12 months of application
- Lower cost than magnetic labels but less reusable
These labels work well for warehouses that reconfigure 1–2 times per year but don't need the daily repositioning flexibility of magnetic solutions.
Cold Storage and Freezer Labels
If your facility runs below 32°F, invest in freezer-grade materials from the start — standard labels will fail and require complete relabeling within months.
Standard pressure-sensitive adhesives lose bonding strength below 41°F (5°C) and peel off within weeks. Two material types hold up in cold environments:
Freezer-grade adhesive labels:
- Application temperature: Down to -20°F (-29°C)
- Service temperature: -80°C to 80°C (-112°F to 176°F)
- Rubber-based or solvent acrylic adhesives maintain bond at extreme cold
Magnetic labels for cold storage:
- No adhesive to fail at low temperatures
- Service range includes standard freezer temperatures (0°F to -20°F)
- Easier to install in cold environments — no warm-up period required
Common Mistakes to Avoid When Labeling Warehouse Racks
Skipping the Layout Plan Before Printing Labels
Applying labels before finalizing the address system creates mismatches between physical locations and WMS entries. This forces operators to "interpret" labels rather than simply scanning them, slowing pick times and increasing errors. Always complete your zone mapping, naming hierarchy, and WMS configuration before printing a single label.
Inconsistent Label Placement Across the Facility
When label positions vary across the facility—left uprights in one aisle, right beam faces in another, eye level here, knee height there—workers search for labels instead of scanning them on instinct. That search adds 5-10 seconds per pick location, which compounds to hours of wasted time daily.
Choose one standard placement and enforce it across all racks without exception.
Using Labels Not Appropriate for the Environment
Standard paper labels in cold storage, wet environments, or high-UV areas degrade within months. Barcodes fade, adhesive fails, and labels peel off—forcing emergency relabeling projects that disrupt operations. Match label material to operating conditions:
- Cold storage below 32°F: Freezer-grade adhesive or magnetic labels
- Outdoor or high-UV areas: Laminated labels with UV-resistant inks
- Chemical exposure: Polyester or polyimide facestocks with chemical-resistant adhesives
- Frequent layout changes: Magnetic or removable clean-release labels
Designing a Naming Scheme with No Room for Growth
Using single-digit bay numbering (1-9) in a warehouse likely to expand means a complete relabeling project when you add a 10th bay. The same applies to aisles, zones, and levels. Build scalability into the initial design by using leading zeros (01-99) and formatting every field to accommodate at least double your current capacity.
Conclusion
Efficient warehouse rack labeling depends on getting the fundamentals right: a logical hierarchical address system (Zone-Aisle-Bay-Level-Bin), consistent placement and format across all racks, and label materials built for your environment. When these align, picking errors drop, search time disappears, and scanning accuracy holds up for years.
The system is only as effective as its alignment with pick paths and your warehouse management software. Physical labels must exactly match WMS location naming — any disconnect erodes operator trust and compounds errors at scale.
Pre-installation planning is where that alignment starts. Mapping your address schema, label formats, and placement standards before the first label goes up prevents the costly rework of relabeling an active facility — and puts your operation in a position to see accurate picks from day one.
Frequently Asked Questions
What are the best practices for warehouse labeling?
Use a hierarchical address system (Zone-Aisle-Bay-Level-Bin), place labels at a consistent height on each rack, and alternate numbers and letters to reduce transposition errors. Use leading zeros for all numeric fields and ensure every location address matches your WMS naming convention exactly.
What is an example of a warehouse label?
A typical warehouse rack label displays "A-03-B-02" representing Aisle A, Bay 3, Shelf B, Bin 2. The label includes this human-readable address alongside a scannable barcode (Code 128 or Data Matrix) and may feature color coding for zone or product category identification.
How do I create a warehouse location numbering system?
Start with the Zone-Aisle-Bay-Shelf-Bin hierarchy and number sequentially using leading zeros (01, 02, 03). Alternate numbers and letters between levels for visual clarity, and size each field to accommodate at least double your current capacity so the system scales without relabeling.
What type of labels work best in cold storage or freezer warehouses?
Magnetic labels and freezer-grade adhesive labels are preferred in cold storage below 32°F. Standard adhesive labels lose bonding strength at low temperatures and peel off within weeks. Freezer-grade labels use specialized rubber-based or solvent acrylic adhesives rated for application at -20°F and service temperatures down to -112°F.
When should I relabel warehouse racks?
Relabel after a layout reconfiguration, a WMS upgrade that changes location names, significant label wear, or a conversion from bulk storage to picking bays. Schedule the work during low-activity periods so physical labels and WMS data stay synchronized with minimal disruption.
How do warehouse rack labels connect to a WMS?
Location addresses on physical labels must exactly match the names in your WMS — when they do, scanning a label barcode instantly confirms the correct pick location and enables real-time inventory tracking. Mismatches between physical labels and WMS entries are a leading cause of picking errors and system implementation failures.